Tea Extras Cakes Brownies Scones Sandwiches Muffins Sandwiches Other Image Map
Showing posts with label fondant. Show all posts

Oct 5, 2013

Jun 18, 2012

How to: flower fairy cake topper


A really cute fairy which you can place on top of a cake. You can also make it smaller and place it on top of a cupcake. It's made by using some easy techniques. 


May 9, 2012

How to: paint on a fondant cake


You can create gourgeous paintings on your cake with edible food color.
Are you going to be the next Picasso?


What you need:
- Synthetic brushes
- Liquid, paste or powder food colors
- Rum, Wodka or other clear liquor
- Artist palette for your colors


Instruction


Step 1: Once your cake is covered with fondant, paint a design on your cake with a food writer or non-toxic marker. 

Another way is to use metal or platic cutters as engravers to inprint the design on the fondant. If you are a good painter, you can also draw the design on a paper as an example. 


Step 2: Dilute the liquid, paste or powder food colors with rum, wodka or other clear liquor. Wodka works really good and you don't taste it. You can also use water to dilute but then the drying process is slower.


Step 3: Use different brushes for each color and different sizes of brushes. 


Step 4: The diffusion of colors to obtain light and dark contrasts can be done with another clean brush. 


Source: Nevie Pie Cakes


May 8, 2012

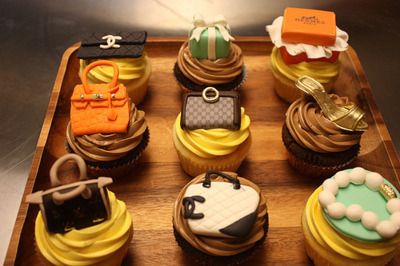
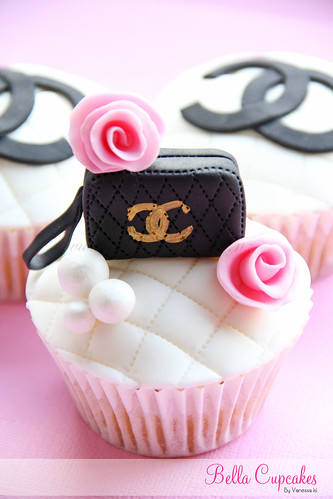
Cupcake ideas for fashion lovers

Here are some ideas to make cupcakes for the fashion lovers! 
Shoes, purses, pearls, Chanel & Louis Vuitton!


How to: cover cupcakes with poured fondant

Ingredients
- White fondant
- Abricot jam
- Hot boiled water
- Cupcakes 
- Pastry brush
- Tea spoon
- Heatproof bowls
- Optional: food colors


Instruction


Step 1:
B
rush the cupcakes with a thin coat of hot abricot jam. 
Let it dry.


Step 2: Place the fondant in a heatproff bowl and heat it gently in the microway for approx 1 min. It needs to be warm but dont let it boil. Give it a stir to get it smooth. It is important that you get the right consistency. If it gets too thick you will have difficulty to dip the cupcake properly and if it is too thin it will look transparent on the cupcake. Give it a few tries and you will find the right consistency. You can use boiled water, a teaspoon at a time, to thin it down. If it gets too cold gently reheat it in the microway oven a few seconds.


Step 3: 
Now take the cupcake and dip it upside down in the hot fondant. Carefully shake the excess fondant off. I like to dip my cupcakes so the fondant sticks to the paper cases. 


Step 4: 
Set the cupcakes aside and let them dry. If you like you can give them a second coat when the first one is dry. 


Step 5: 
Attach your choosen or selfmade decoration on the cupcakes with dots of royal icing or some honey.


Note: Store the cupcakes in cake boxes. NOT in the refrigerator because that will dissolve the poured fondant. Also air thight containers can make the fondant melting.

Source: http://www.cakejournal.com


May 3, 2012

Ideas for Mother's Day


Chocolate-Dipped


Sweet as a Rose Cake

Filigree Fruit Cup

Sew Very Nice Mother's Day Pillow Cake


How to: cover cakes with rolled fondant

How do you cover a cake with fondant that's perfectly smooth,
without wrinkles or air bubbles? The flexibility of fondant is your
secret weapon. Just follow our instructions for the right ways to knead,
roll out and lift the fondant, and you'll find that covering a cake is easy.


Round cake

step 1

Prepare cake by lightly covering with buttercream icing.

step 2

Before rolling out fondant, knead it until it is a workable consistency.
If fondant is sticky, knead in a little confectioners' sugar. Lightly dust
your work surface and your rolling pin with confectioners' sugar to prevent
sticking. Roll out fondant sized to your cake. To keep fondant from sticking,
 lift and move as you roll. Add more confectioners' sugar if needed.

step 3

Gently lift fondant over rolling pin or slip cake circle under fondant to
move; position on cake.

step 4

Shape fondant to sides of cake with a Smoother. We recommend using
 the Smoother because the pressure of your hands may leave impressions
 on the fondant. Beginning in the middle of the cake top, move the Smoother
 outward and down the sides to smooth and shape fondant to the cake and
 remove air bubbles. If an air bubble appears, insert a pin on an angle,
release air and smooth the area again. Use the straight edge of the
Smoother to mark fondant at the base of cake. Trim off excess fondant
using a sharp knife.

step 5

Your cake is now ready to decorate.

Covering large rounds with rolled fondant

In most cases, the smaller your cake, the easier it will be to cover with rolled fondant. However,
there is an easy way to position and smooth fondant on cakes that are 12 in. diameter or larger.
Follow the steps below to lift fondant onto the cake without tearing.

step 1

Cover cake lightly with buttercream icing. Roll out fondant sized to your
cake.

step 2

Slide a large cake circle that has been dusted with confectioners' sugar
under the rolled fondant. Lift the circle and the fondant and position over
cake. Gently shake the circle to slide the fondant off the board and into
position on the cake. Smooth and trim as described above.


Square cake

step 1

Position fondant on cake, smoothing the top with a Smoother. Pull the
corner flaps gently out and away from the cake; smooth the corners
with hand to eliminate the creases. Smooth sides with Smoother.

step 2

Trim off excess fondant at bottom with a spatula or sharp knife.

step 3

To give a finished look, smooth top, all sides and bottom edge of
cake again with the Smoother.


Tip: Don't use to much confectioners sugar, it makes the fondant dry.
Tip: Don't know how much fondant to buy to cover te cake?
Click on this link to see the post with the fondant coverage chart. 

Fondant Coverage Chart

Use this chart to determine how much Fondant to buy. Amounts listed do not include decorations. 


Cake Size:SizeUse this Amount
Rounds
4 in. high
6"18 oz.
8"24 oz.
10"36 oz.
12"48 oz.
14"72 oz.
16"108 oz.
18"140 oz.
Rounds
3 in. high
6"14 oz.
8"18 oz.
10"24 oz.
12"36 oz.
14"48 oz.
16"72 oz.
18"108 oz.
Sheets
2 in. high
7 x 11"30 oz.
9 x 13"40 oz.
11 x 15"60 oz.
12 x 18"80 oz.
Ovals
4 in. high
7 3/4 x 5 5/8"24 oz.
10 3/4 x 7 7/8"48 oz.
13 x 9 7/8 "48 oz.
16 1/2 x 12 3/8"72 oz.
Hearts
4 in. high
6"18 oz.
8"26 oz.
9"32 oz.
10"36 oz.
12"48 oz.
14"72 oz.
15"72 oz.
16"96 oz.
Petals
4 in. high
6"18 oz.
9"30 oz.
12"48 oz.
15"72 oz.
Squares
4 in. high
6"24 oz.
8"36 oz.
10"48 oz.
12"72 oz.
14"96 oz.
16"120 oz.
Hexagons
4 in. high
6"18 oz.
9"36 oz.
12"48 oz.
15"84 oz.
Paisley
4 in. high
6 x 9"20 oz.
9 x 12-3/4"48 oz.
12 x 17"72 oz.
Diamond
4 in. high
10-1/4 x 7-2/5"24 oz.
15 x 11"36 oz.
19-1/4 x 14-1/4"60 oz.
Pillow
4 in. high
6-3/4 x 6-3/4"16 oz.
10 x 10"28 oz.
13-1/4 x 13-1/4"48 oz.